Springing into Summer
And suddenly, we’ve got full on summer weather! This was my third winter in Canada, and by far the most extreme. I was longing for spring, but we seemed to have skipped it and gone straight to summer, which is alright too. I’ve been meaning to write an update, but too much has been going on! On the business front, I’ve just signed a contract with FineLine Perspectives. I’m so excited to be working with them! Fortunately, I’m still able to freelance in my spare time. Perfect!
On the home front, Aaron’s teaching me to rollerblade. I love it! Except when we go down a hill and I can’t stop (it’s not like ice skates!) and I’m afraid I’m going to bowl over the poor elderly man in front of me. In other exciting news, we bought some plants! We’re such amateurs, but having grown up benefiting from Mom’s fantastic garden, I decided it was time I start a miniature version. They’re all in pots- two strawberry plants, cherry tomatoes, and sweet and greek basil. Anyone ever used greek basil? It’s an experiment for us.
And lastly, in the kitchen! Time to celebrate this stunning weather with something light and cheery. Of course, I couldn’t resist experimenting. I decided to try those beautiful mini pavlovas I’ve seen all over Pinterest. I decided they must be difficult, or they wouldn’t be so pretty. I was wrong! I mean they are still pretty, but they’re so simple. Please make them right away. Oh, and they’re gluten-free!
Basic Mini Pavlovas
Makes 12
4 large egg whites
1 1/4 cups sugar
1 tsp pure vanilla extract
1 Tbsp cornstarch
2 tsp cream of tartar
1 tsp white vinegar
4 Tbsp boiling water
2 cups heavy whipping cream
2 Tbsp powdered sugar
Fresh fruit
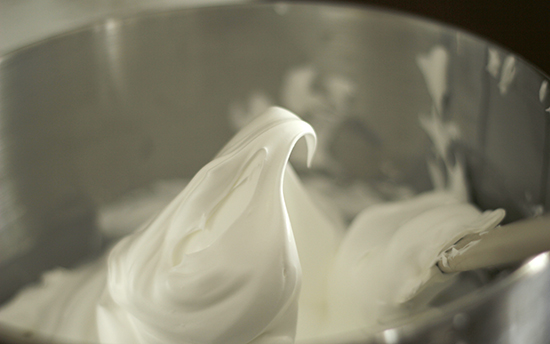
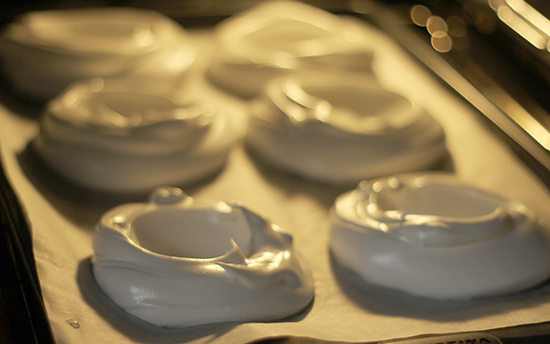
Preheat oven to 250 degrees. Place the first 6 ingredients in a large mixing bowl. Add the boiling water very carefully. Start the mixer beating at a high speed, occasionally stopping to wipe down the sides of the bowl. It will take 7-10 minutes of continual beating. You know it’s done when it is very thick and there are stiff peaks forming. It will be very glossy looking. In the mean time, prepare the baking sheets for your pavlovas. You will need two baking sheets and two pieces of parchment paper to line them. Use a permanent marker and a bowl or cup to trace six circles on each sheet of paper. Mine were about 5 or 6 inches in diameter. Then flip the paper over so the side with ink is facing down.
Next, spoon the egg white mixture onto the circles. You can use a spoon to dollop them, or you can be a bit more decorative. I put all the mixture in a gallon size ziploc and cut the corner off, then swirled my meringues onto the circles. Next, Use a spoon or spatula to create dips in the center of the pavlovas so you have room for your filling and berries later.
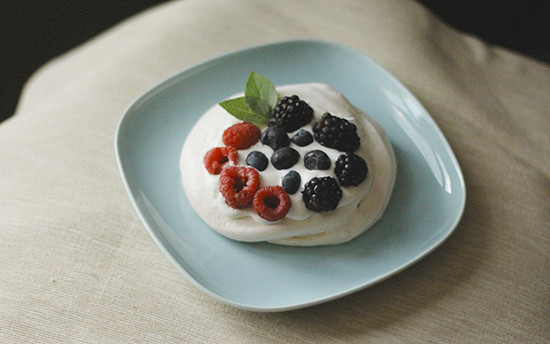
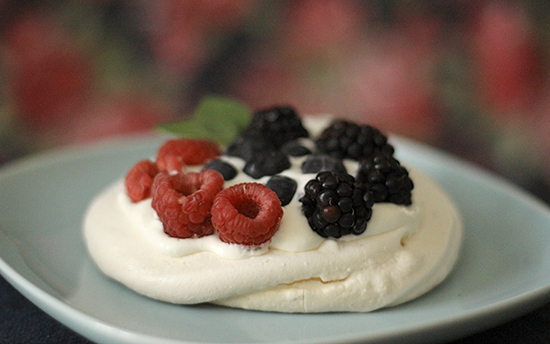
If they fit, you can bake the trays at the same time, 250 degrees for one hour, and then reduce the heat to 225 and bake for 30 more minutes. After they’re done, turn off the oven and open the door slightly while they cool. Do not cool them in the fridge or they will become sticky and gooey. When they’re cool, decorate them! You can use any kind of filling you like, puddings, creams, etc. For mine, I whipped my cream with the powdered sugar, then topped with berries.
To make one large meringue, it is exactly the same process and cooking time, but use a dinner plate to trace one big circle instead of 12 smaller ones.
Enjoy!